The first time I made these Halloween chocolate trifle layers, the kitchen looked like a haunted bakery—chocolate everywhere, ghosts (aka marshmallows) peeking out of bowls, and sprinkles scattered like confetti. Honestly, the smell alone was enough to make me forget about the chaos. Rich cocoa mingled with a hint of vanilla and a sweet undertone from whipped cream. It was one of those moments when you just know you’re onto something special.
I stumbled upon this idea during a last-minute scramble for a party dessert. I wanted something decadent, but also festive and fun for Halloween. You know the kind—easy enough for kids to help decorate, but impressive enough to snag some “oohs” from adults. These chocolate trifle layers tick every box: gorgeous to look at, loaded with flavor, and customizable for every level of spooky you want.
What I love most is how adaptable the recipe is. You can go wild with toppings—gummy worms, candy eyeballs, crushed cookies, the works. It’s part dessert, part edible craft project. After testing this recipe for three different parties (and a few random Wednesdays), I’m convinced it’s foolproof. The layers stay neat, the flavors meld perfectly, and it’s always the first thing to disappear from the dessert table. If you’re after a recipe that’s got Halloween spirit, is totally delicious, and is pretty much guaranteed to get pinned (and repinned), these Halloween chocolate trifle layers are the answer.
Whether you’re hosting a crowd, wrangling a gaggle of costumed kids, or just want a treat for yourself, this recipe delivers. And don’t be surprised if you find yourself making it long after the cobwebs come down—chocolate trifles never go out of season!
Why You’ll Love This Recipe
- Quick & Easy: Comes together in under 30 minutes (not counting chill time if you want it colder). No baking marathon required!
- Simple Ingredients: Most of these are pantry staples and store-bought shortcuts (pudding, cookies, whipped cream) make it stress-free. No fancy chocolate tempering or rare candies needed.
- Perfect for Halloween Parties: This dessert is a showstopper for spooky gatherings, potlucks, and haunted house events. Kids get a kick out of the layers, and adults appreciate the rich chocolatey goodness.
- Crowd-Pleaser: I’ve seen picky eaters, chocolate snobs, and even non-dessert folks go for seconds. It’s magic in a bowl.
- Unbelievably Delicious: Creamy pudding, fluffy whipped cream, crunchy cookies, and candy decorations—each spoonful is a surprise. The textures are so satisfying, especially with those hidden bits of chocolate.
Here’s the thing that sets my Halloween chocolate trifle layers apart: I use a blend of chocolate pudding and crushed chocolate sandwich cookies for the base, but I layer in homemade whipped cream (or you can use store-bought for speed). Then, I alternate in candy and crunchy bits so you get a little bit of everything in each bite. Sometimes I’ll add a dash of espresso powder to deepen the chocolate flavor—just a tiny pinch makes all the difference!
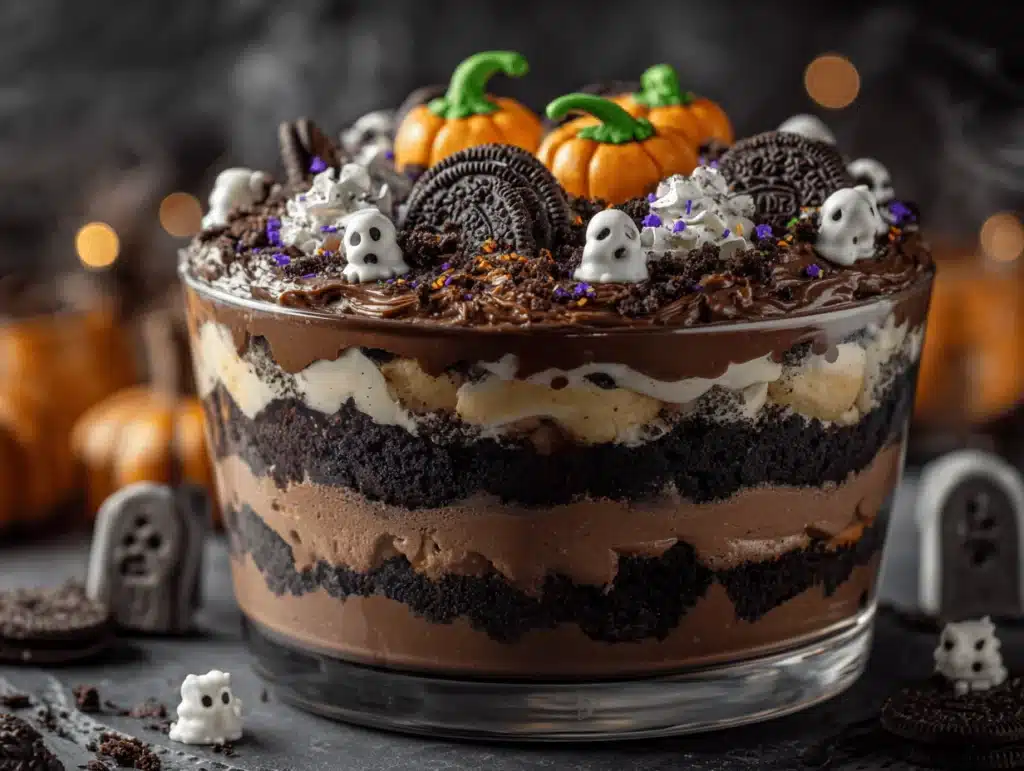
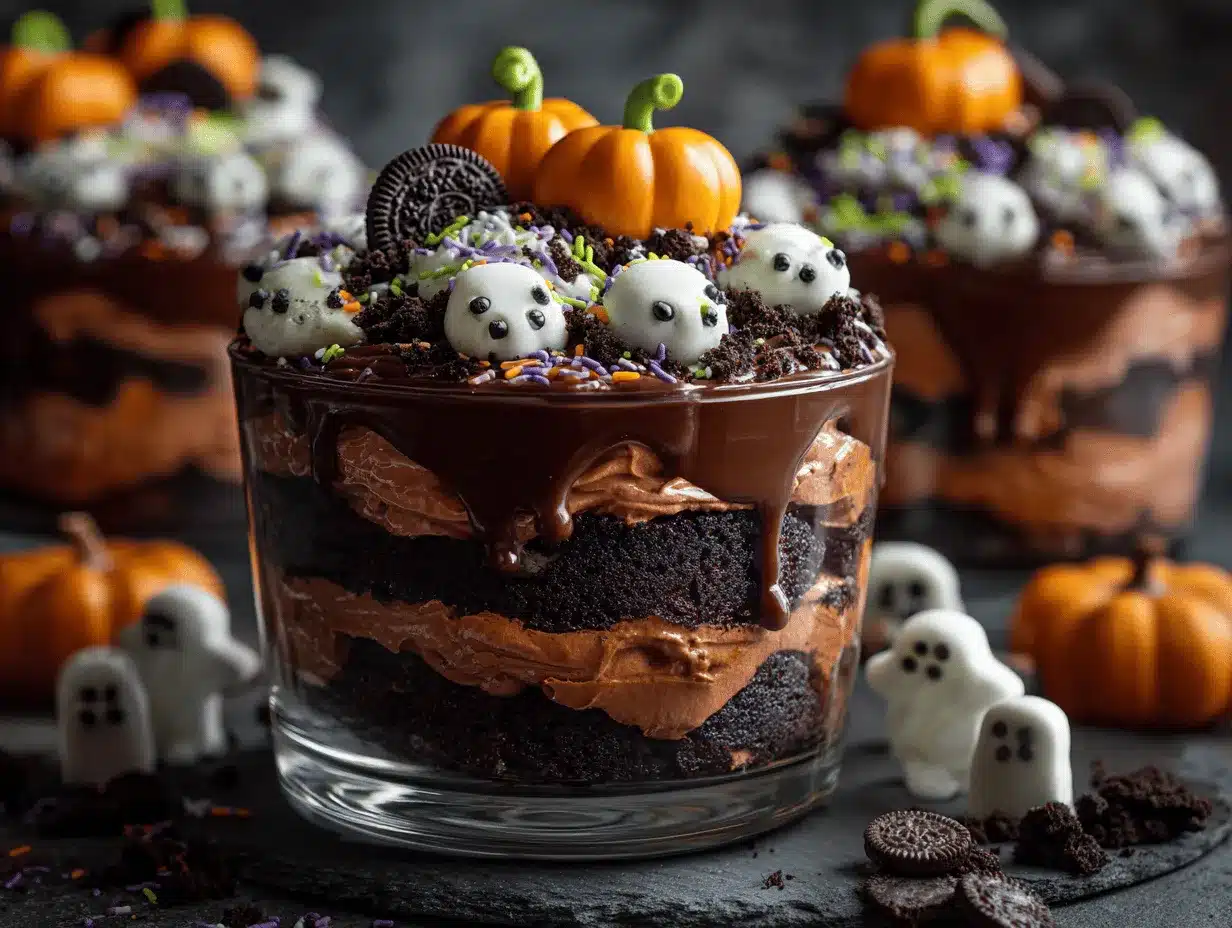
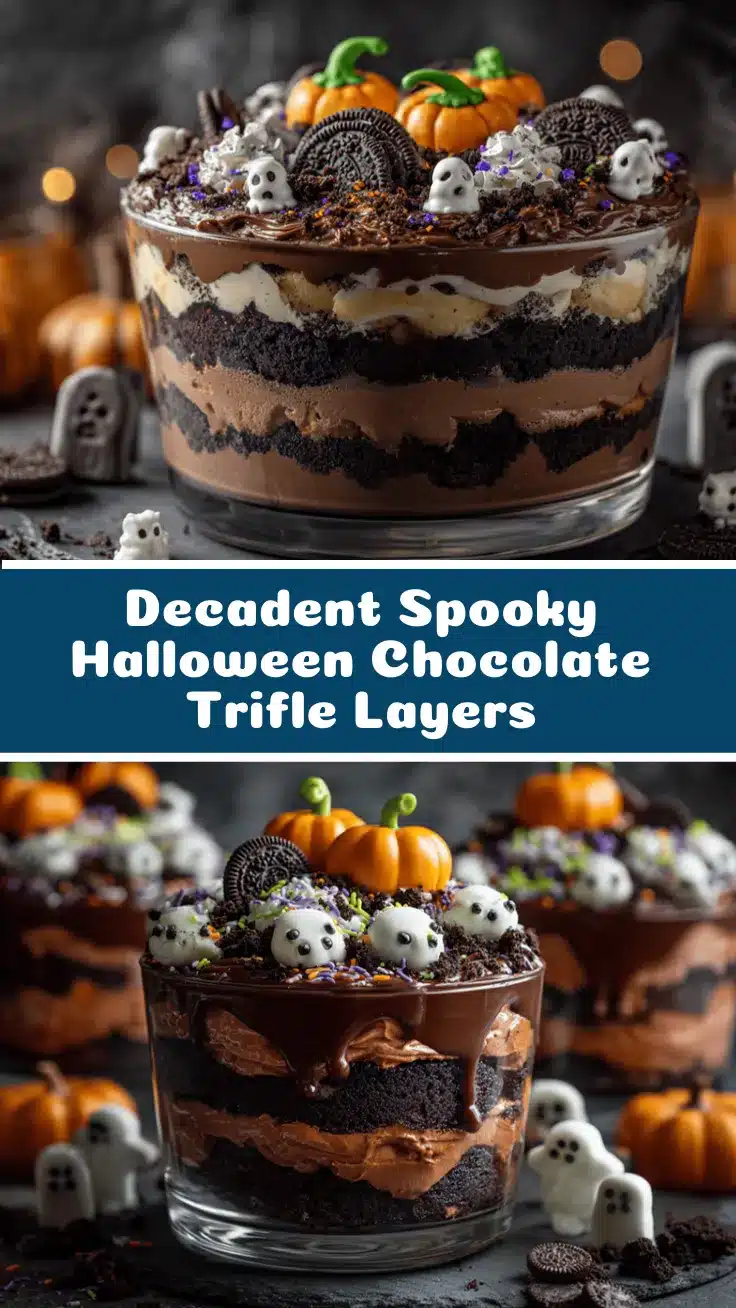
It’s not just about the taste, though. This dessert is a visual treat. Each layer pops with contrast—dark pudding, bright whipped cream, orange sprinkles, and spooky candy eyes. You can customize each trifle cup for your guests (or let kids decorate their own). It’s comfort food, but with a playful twist. Plus, you can make it ahead and it actually tastes better chilled overnight.
If you want a dessert that’s festive, flavorful, and guaranteed to impress, these Halloween chocolate trifle layers are your ticket. They’re the kind of treat you make once and instantly add to your annual party menu. Trust me—after making these every October, I wouldn’t dare show up to a party without them!
What Ingredients You Will Need
This recipe relies on classic ingredients for bold chocolate flavor, layered textures, and plenty of Halloween fun. Most are pantry staples, and the rest are easy to find in the baking aisle or seasonal section.
- For the Chocolate Layer:
- Chocolate pudding mix (2 boxes, 3.9 oz / 110g each) – instant works best for speed
- Cold milk (4 cups / 950ml) – for mixing with pudding
- Chocolate sandwich cookies (about 20 cookies, crushed) – adds crunch and depth
- For the Whipped Cream Layer:
- Heavy whipping cream (2 cups / 480ml) – for homemade whipped cream
- Powdered sugar (4 tbsp / 30g) – sweetens whipped cream
- Vanilla extract (1 tsp / 5ml) – for flavor
- OR store-bought whipped topping (16 oz / 454g) – if you’re short on time
- For Spooky Decorations:
- Candy eyeballs (a handful, for topping)
- Halloween sprinkles (orange, black, purple)
- Mini marshmallows (for ghost shapes)
- Gummy worms or spiders (optional, for extra creepiness)
- Crushed chocolate chips (¼ cup / 45g, optional for extra richness)
- Substitution Ideas:
- Gluten-free chocolate sandwich cookies – for a gluten-free version
- Dairy-free whipped topping and almond milk – for a lactose-free trifle
- Vanilla pudding instead of chocolate – for a lighter twist (but let’s face it, chocolate rules Halloween)
I’ve used both generic and brand-name pudding mixes—honestly, the difference is minimal once layered up. For the cookies, Oreos or any store-brand work fine. If you go homemade on the whipped cream, the key is to whip until soft peaks (don’t overbeat or you’ll get butter). Candy decorations are where you can be creative—my kids love placing the eyeballs in strategic “scary” spots.
Feel free to swap in seasonal candies, or use leftover Halloween loot for decoration. These layers are forgiving, so use what you have. Just don’t skip the chocolate—otherwise, it’s not a Halloween chocolate trifle!
Equipment Needed
- Mixing bowls (at least two, medium-sized)
- Electric mixer or whisk (for whipping cream)
- Measuring cups and spoons (accuracy matters for pudding and cream)
- Spatula (for layering)
- Clear trifle dish or individual cups (glass shows off the layers—highly recommended for Pinterest-worthy presentation)
- Plastic sandwich bag or rolling pin (for crushing cookies)
- Spoons (for layering and serving)
If you don’t have an electric mixer, a sturdy whisk and some elbow grease will get you there. I’ve made whipped cream with both, and while the mixer is faster, whisking by hand gives you more control (and a mini arm workout). For crushing cookies, a sealed bag and rolling pin is classic, but sometimes I just pulse them in a food processor (quick, less mess).
Budget-friendly tip: Dollar stores often have cute clear cups perfect for individual trifles. If you’re using a big trifle bowl, layer carefully for that Instagrammable look. And don’t forget, glass is key for maximum Halloween impact!
Preparation Method
- Prepare the Chocolate Pudding:
- In a large mixing bowl, combine both boxes of chocolate pudding mix (7.8 oz / 220g) with 4 cups (950ml) cold milk.
- Whisk for about 2 minutes until thickened. Let it sit for 5 minutes to fully set.
- Tip: If it looks runny, chill it for 10 minutes—instant pudding thickens as it stands.
- Whip the Cream:
- Pour 2 cups (480ml) heavy whipping cream into a chilled bowl.
- Beat with an electric mixer on medium-high until soft peaks form (about 3–4 minutes).
- Add 4 tbsp (30g) powdered sugar and 1 tsp (5ml) vanilla extract. Beat another 30 seconds.
- Warning: Overbeating will turn it grainy. Stop when it holds shape but is still creamy.
- Alternatively, fold in store-bought whipped topping if using.
- Crush the Cookies:
- Place 20 chocolate sandwich cookies in a sealed plastic bag.
- Use a rolling pin or the bottom of a mug to crush into chunky crumbs (not powdery).
- Sensory cue: You want some crunchy bits for texture!
- Layer the Trifle:
- In your clear trifle dish or cups, spoon a layer of chocolate pudding (about ⅓ of the total).
- Sprinkle a generous layer of crushed cookies (⅓ of the crumbs).
- Add a layer of whipped cream (⅓ of the batch).
- Repeat layers twice more: pudding, cookies, cream. You should end up with 3 sets of each layer.
- Note: Press lightly with a spoon between layers to keep things tidy—but don’t squish too much or you’ll lose the fluff.
- Add Spooky Decorations:
- Scatter Halloween sprinkles, candy eyeballs, and mini marshmallow ghosts on top.
- Stick a few gummy worms or spiders into the cream to look like they’re crawling out.
- Finish with a sprinkle of crushed chocolate chips for extra richness.
- Tip: Get creative—layer candy inside if you want hidden surprises!
- Chill (Optional):
- Cover loosely with plastic wrap and refrigerate for 1–2 hours if you want it extra cold and set.
- Warning: Don’t chill too long or cookies will get soggy—unless you like that pudding-cake vibe.
- Serve:
- Use a big spoon for trifle dishes or hand out cups with mini spoons for individual servings.
- Sensory cue: The perfect bite has pudding, cream, cookie crunch, and a candy decoration!
Personal tip: I like to assemble these right before guests arrive so the cookies stay crisp. If you’re prepping ahead, keep decorations aside and add just before serving—they’ll stay vibrant and not bleed color into the cream.
Cooking Tips & Techniques
I’ve learned a few things over the years making these Halloween chocolate trifle layers—sometimes the hard way! Here’s how to get perfect results every time:
- Layering Technique: Use a spoon and gently spread each layer to the edges of the bowl or cups. For extra neatness, wipe the inside glass between layers with a paper towel if you’re picky about presentation.
- Don’t Overwhip Cream: Soft peaks are the goal. If you go too far, it gets grainy—not ideal for fluffy trifle layers.
- Chill Pudding Properly: Instant pudding thickens as it stands. If it’s too liquid, pop it in the fridge for a bit; don’t rush the process.
- Cookie Crunch: Crushed cookies add texture, but if you crush them too fine, you’ll lose that crunch. A few chunky bits are perfect.
- Decoration Timing: Add candy and sprinkles just before serving, especially if you’re using gel candies—they can bleed into the cream over time.
Common mistakes? Once, I tried to use warm pudding—major fail. It melted the whipped cream and turned everything runny. Another time, I skipped the chilling step and the layers blended together. Lesson learned: patience is your friend. Multitasking is key—whip the cream while pudding sets, crush cookies while cream whips. It’s all about rhythm.
If you want consistent results, measure ingredients precisely. And taste as you go—sometimes a pinch of salt (yes, salt!) in the pudding brings out the chocolate flavor. Don’t be afraid to tweak based on your preferences. That’s half the fun!
Variations & Adaptations
One of the best things about this recipe is how easy it is to adapt. Here are some of my favorite twists:
- Gluten-Free Version: Use gluten-free chocolate sandwich cookies and check your pudding mix for wheat ingredients. Works just as well—no one will notice the difference!
- Dairy-Free Adaptation: Substitute almond or coconut milk for cow’s milk, and use a dairy-free whipped topping. Tastes just as creamy, and it’s perfect for guests with sensitivities.
- Flavor Swaps: Try peanut butter cookies instead of chocolate, or add a layer of caramel sauce between pudding and cream. For extra spooky vibes, use green-tinted vanilla pudding as a layer (think Frankenstein!).
- Seasonal Additions: For Thanksgiving, swap in pumpkin spice pudding and use cinnamon cookies. For Christmas, add crushed peppermint candies on top.
- Personal Favorite: I once added a layer of raspberry preserves between the pudding and whipped cream—surprisingly delicious, like a chocolate-raspberry cake but way easier!
Don’t be afraid to get creative. These Halloween chocolate trifle layers are a canvas for your taste buds. If you’re cooking for allergies, double-check candy labels and pudding ingredients—especially for gluten and dairy. Every year, I try a new twist, and it’s always a hit!
Serving & Storage Suggestions
Serve these Halloween chocolate trifle layers chilled for best texture—the cream is fluffiest and the pudding sets just right. Presentation matters, so use clear cups or a trifle bowl to show off those layers. If you’re serving a crowd, let guests scoop their own, or pre-portion into mini cups for easy grab-and-go.
Pair with hot chocolate, apple cider, or a spooky punch (the kind with gummy worms floating, obviously). For a dessert table, set alongside pumpkin cookies or caramel apples for a full Halloween spread.
To store, cover tightly with plastic wrap and refrigerate for up to 2 days. The cookies will soften, so if you like crunch, add a fresh sprinkle right before serving. Freezing isn’t recommended—the whipped cream loses its texture. Reheat? Not needed, but you can let it sit at room temp for 10 minutes if the layers are super cold. Flavors deepen overnight, making leftovers even more delicious (if you have any!).
Nutritional Information & Benefits
Each serving (about 1 cup / 240ml) delivers roughly 350 calories, with 7g protein, 15g fat, and 45g carbs. Chocolate provides antioxidants and a mood boost—let’s face it, Halloween is all about indulgence. Whipped cream adds calcium, and if you use almond milk, you get an extra vitamin E kick.
Dietary notes: This can be made gluten-free and dairy-free with easy swaps. Contains wheat (cookies), milk (pudding and cream), and possible soy (candies). If you’re watching sugar, consider using sugar-free pudding and light whipped topping. Personally, I like knowing I can serve this to a range of guests and just tweak as needed.
Conclusion
If you’re searching for a spooky, crowd-pleasing dessert that’s fun to make and guaranteed to impress, these Halloween chocolate trifle layers are your answer. The layers are gorgeous, the flavors are rich, and the decorating possibilities are endless. Every year, I get requests for this recipe—honestly, it’s become a party tradition in our house.
Don’t be afraid to customize based on your family’s favorites or dietary needs. There’s no wrong way to build a trifle! I love this recipe because it’s forgiving, festive, and always a hit. Plus, the memories you’ll make decorating together? Priceless.
If you try these Halloween chocolate trifle layers, let me know in the comments how you made them your own! Share your photos, tag me on social, and spread the spooky trifle love. Happy Halloween and happy layering!
FAQs
Can I make Halloween chocolate trifle layers ahead of time?
Absolutely! Assemble up to a day in advance, but add candy decorations just before serving for best color and texture.
What’s the best way to crush cookies for the trifle?
Seal them in a plastic bag and use a rolling pin, or pulse in a food processor for quick, even crumbs.
Can this recipe be made gluten-free?
Yes—just use gluten-free chocolate sandwich cookies and check your pudding mix for wheat ingredients.
How do I keep the whipped cream from getting runny?
Use cold cream, whip to soft peaks, and don’t overbeat. If using store-bought topping, keep it cold until layering.
What candies work best for spooky decorations?
Candy eyeballs, gummy worms, Halloween sprinkles, and mini marshmallows are all great. Choose your favorites, and let the kids help decorate!
Pin This Recipe!

Halloween Chocolate Trifle Layers Easy Spooky Dessert Recipe for Parties
- Total Time: 30 minutes
- Yield: 10 servings 1x
Description
These Halloween chocolate trifle layers are a decadent, festive dessert perfect for parties. Rich chocolate pudding, crunchy cookies, fluffy whipped cream, and spooky candy decorations make this treat a crowd-pleaser for kids and adults alike.
Ingredients
- 2 boxes (3.9 oz each) instant chocolate pudding mix
- 4 cups cold milk
- 20 chocolate sandwich cookies (Oreos or similar), crushed
- 2 cups heavy whipping cream
- 4 tbsp powdered sugar
- 1 tsp vanilla extract
- OR 16 oz store-bought whipped topping
- Candy eyeballs (for topping)
- Halloween sprinkles (orange, black, purple)
- Mini marshmallows (for ghost shapes)
- Gummy worms or spiders (optional)
- 1/4 cup crushed chocolate chips (optional)
- Gluten-free chocolate sandwich cookies (optional, for gluten-free)
- Dairy-free whipped topping and almond milk (optional, for dairy-free)
- Vanilla pudding (optional, for flavor variation)
Instructions
- In a large mixing bowl, combine both boxes of chocolate pudding mix with 4 cups cold milk. Whisk for about 2 minutes until thickened. Let sit for 5 minutes to fully set.
- Pour heavy whipping cream into a chilled bowl. Beat with an electric mixer on medium-high until soft peaks form (about 3–4 minutes). Add powdered sugar and vanilla extract, beat another 30 seconds. Alternatively, fold in store-bought whipped topping if using.
- Place chocolate sandwich cookies in a sealed plastic bag. Use a rolling pin or the bottom of a mug to crush into chunky crumbs.
- In a clear trifle dish or cups, spoon a layer of chocolate pudding (about 1/3 of the total). Sprinkle a generous layer of crushed cookies (1/3 of the crumbs). Add a layer of whipped cream (1/3 of the batch). Repeat layers twice more: pudding, cookies, cream.
- Scatter Halloween sprinkles, candy eyeballs, and mini marshmallow ghosts on top. Add gummy worms or spiders and finish with crushed chocolate chips.
- Cover loosely with plastic wrap and refrigerate for 1–2 hours if you want it extra cold and set.
- Serve chilled, using a big spoon for trifle dishes or mini spoons for individual cups.
Notes
For best texture, assemble just before serving or add decorations last. Use gluten-free cookies and dairy-free whipped topping for dietary needs. Don’t overwhip cream; soft peaks are ideal. Chill pudding until set before layering. Add a pinch of salt to pudding for deeper chocolate flavor. Customize with your favorite candies and toppings.
- Prep Time: 15 minutes
- Cook Time: 0 minutes
- Category: Dessert
- Cuisine: American
Nutrition
- Serving Size: 1 cup (240ml) per serving
- Calories: 350
- Sugar: 30
- Sodium: 350
- Fat: 15
- Saturated Fat: 9
- Carbohydrates: 45
- Fiber: 2
- Protein: 7
Keywords: Halloween dessert, chocolate trifle, party recipe, spooky treat, kid-friendly, easy trifle, no bake, festive dessert